
PRESENTERS Some businesses deal with long-term contracts that include many individual speaking engagements over a period of weeks, months or even years. EventCX provides a way to group events together using a “parent-child” metaphor, where a “parent” event has one or more “child” events. The “parent” event is often dateless (has no stage time) and contains attached documents and other information about the contract as a whole. Each of the “child” events associated with the “parent” is an individual engagement and contains attached documents, contacts, travel plans, etc. related to just that engagement. For instance:
- Parent event: 1 year contract for 3 consulting visits
- Child 1: on-site engagement on January 15
- Child 2: 60 minute video call with the team on March 11
- Child 3: on-site visit on June 22
Events in a “family” relationship behave in all other ways like a normal event, and you can do anything with them that you can do with any other event.
How Do I Enable the Parent-Child Feature? #
The parent-child feature is not on by default. To turn on the parent-child feature:
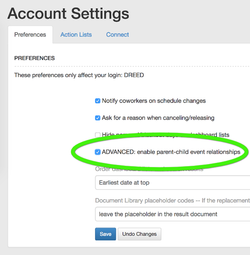
- Sign in to EventCX
- From the USER menu (upper-right, with your username), choose SETTINGS
- Choose PREFERENCES
- On the preferences screen, turn ON the checkbox labeled ENABLE PARENT-CHILD EVENT RELATIONSHIPS
- Click SAVE to commit
NOTE : This preference is saved per user; other users in your organization will need to go through the same procedure so that everyone in the organization has the feature.
How Do I Make a Parent-Child Relationship Between Events? #
A “parent” event can have 1 or more “child” events related to it. Technically, a “child” event can have “children” of its own, but this is not recommended and is not supported. To create a new “child” event for a “parent” event:

- In EventCX, select the event that is to be the “parent” event so that it is the active event.
- On the DETAILS tab, click the CIRCLED DOWN ARROW icon (near the top of that tab) and choose CREATE A NEW CHILD EVENT.
- Fill out the new event form as normal. When complete the new event will have a “child” relationship with the “parent”.
If both the “parent” and “child” events already exist and you want to make the relationship:
- In EventCX, select the event that is to be the “child”.
- Locate and note the “child” event’s id number (in the upper-right of the event information panel).
- Now, select the event that is to be the “parent” event so that it is the active event.
- On the DETAILS tab, click the CIRCLED DOWN ARROW icon (near the top of that tab) and choose ATTACH EXISTING EVENT AS CHILD.
- Enter the EVENT ID number of the existing “child” event and click ATTACH to complete the relationship.
How Can I Tell if an Event Is in a “Parent-Child” Relationship? #
EventCX gives several visual cues that make it easy to tell when an event is in a “family” relationship.


- On “parent” events, the status icon (colored circle in the event information panel top of screen) will have a small DOWN ARROW displayed on the edge of the circle, indicating there is at least one “child” event related to it. This special icon is also displayed in search results.
- On “child” events, the status icon will have a small UP ARROW displayed on the edge of the circle, indicating it has a “parent” event. This special icon is also displayed in search results.
- On “child” events, the CIRCLED UP ARROW icon near the top of the DETAILS tab will be a solid color and will be clickable, giving you options related to the event’s “family”.
- “Child” events automatically display all of the contacts from the “parent” event. These contacts are identified with an a CIRCLED UP ARROW above the contact group code. These contacts cannot be changed from the “child” — to make a change, make the “parent” event active and edit the contact there.
How Can I Easily Move Between Parent and Child Events? #
It is common to want to work with several events in a “family”, and EventCX makes it easy to move between parents, children, and siblings. On a “parent” event:
- With the “parent” event active in EventCX, move to the DETAILS tab.
- On the details tab, click the CIRCLED DOWN ARROW icon (near the top of the tab) and choose from the pop-up menu:
- Choose SEARCH THE FAMILY to display the “parent” and all “children” in the event search window, where it is easy to switch between them by clicking
- All of the “child” events are displayed in the menu; click on any one of them to make that the active event
On a “child” event:
- With the “child” event active in EventCX, move to the DETAILS tab
- On the details tab, click the CIRCLED UP ARROW icon (near the top of the tab) and choose from the pop-up menu:
- Choose OPEN PARENT EVENT to make the “parent” event the active event
- Choose SEARCH THE FAMILY to display the “parent” and all “children” in the event search window, where it is easy to switch between them by clicking
How Can I Detach a “Child” Event From Its “Parent”? #
To take a “child” out of the “family”:
- With the “child” event active in EventCX, move to the DETAILS tab.
- On the details tab, click the CIRCLED UP ARROW icon (near the top of the tab) and choose DETACH FROM THE PARENT EVENT from the pop-up menu.
Once a “parent” has no “children”, it automatically stops being a “parent” event; there’s nothing more to do.


